Not everything needs to be homemade. Especially on days when work is long and your coming down with a cold. But you still gotta eat right? So I open the freezer, good thing I bought that pumpkin tortellini this week!
Step 1: Buy frozen pumpkin tortellini. (I got mine from whole foods)
Step 2: Boil a pot a water.
Step 3: Add Tortellini to the pot and boil till ready. (About 12-15 minutes, or until tender)
That was easy! Now, to rest and sleep! Actually I have gonna open a box of chicken broth, add vegetables, and make this into a soup! Or you can eat it with tomato sauce, pesto sauce, a butter sauce, plain, with chicken, its versatile and pumpkiny!
Thursday, October 25, 2012
Wednesday, October 24, 2012
Pumpkin Pie Cuties
Mini Pumpkin Pies is an idea I got from my fiance's mom. She had made them last week and I thought I should share it with all of you. It's a twist on Pumpkin Pie that we covered on Oct 2. To make it with a real pumpkin, which I think you absolutely should, follow the recipes on Oct 1&2.
Ingredients
See Oct 1 and 2
Cookie of your choice.
(Note: You will not need pie crust)
Step 1: See Oct 1 for making your own pumpkin pie puree.
Step 2: See Oct 2 to make pumpkin pie, but stop once the mixture is ready to pour.
Step 3: Line a Muffin tin with paper liners and put the cookie of your choice on the bottom.
Step 4: Pour pie mixture into cups.
Step 5: Bake at 350 degrees for 45-60 minutes.
Hope you like them! They will be a bit gooey so I suggest eating with a spoon while still in the paper liner. When I had one it was with a Nila Wafer, but I think I chocolate chip cookie would be best! What cookie did you use?
Tuesday, October 23, 2012
Pumpkin Cookies
This is a great recipe. I'm glad I know how to make these because they are a great go to for parties, week night snacks, and last minute bakery needs. Easy and simple (the way I like it) and fun too! I've been using a lot of fall sprinkles lately (I have a four cylinder shaker with pumpkins, yellow and orange dots, brown and orange lines, and orange sugar) because if not now-when?
Makes 48 cookies
Ingredients
Butter, one cup softened (Leave out for 1 hour before baking)
Sugar, 1/2 cup (you know that I only used 1/4 cup)
Pumpkin Puree, 1 cup (See Oct 1st to use a real pumpkin for this!)
Egg, 1
Vanilla, 1 teaspoon
Flour, 2 cups
Baking soda, 1 teaspoon
Salt, 2 teaspoons (I didn't use)
Cinnamon, Nutmeg, Allspice, Ginger, a lot
Step 1: Preheat oven to 350 and get out baking sheets.
Step 3: Cream butter and sugar in a large bowl.
Step 2: Add Pumpkin puree and egg and mix together.
Step 4: Add a few drops of Vanilla.
Step 5: Combine dry ingredients in another bowl.
Step 6: Mix dry ingredients to the wet until just incorporated.
Step 7: Grab teaspoons full of dough, roll up, and drop into a baking sheet. Add sprinkles!!!
Step 8: Bake for 10-12 minutes.
Step 9: Cool on the pan for 1-2 minutes then cool on a baking sheet.
Enjoy with milk! Or with Pumpkin Coffee or Tea (See Oct 5th for recipe) Yum! What a great cookie! I'm gonna add chocolate chips next time! How about you?

Monday, October 22, 2012
Purchasing Pumpkins
Today's post is going to be about all of the Pumpkin things I have encountered this month, outside of what I have made on this blog. This should be helpful to you all who don't have too much time to bake and craft, or want to get pumpkins while you're on the go!
Pumpkin frozen yogurt- 16 Handles
Pumpkin Macaroons- Macroon Bakery
Pumpkin Pie Candle- Micaels

Pumpkin Spice Candle- Home Goods
A million pumpkin crafts- Michaels
Pumpkin Sushi- Ichiban

Pumpkin Spice Latte, Pumpkin scone, Pumpkin bread, and Pumpkin Muffin- Starbucks
Pumpkin Spice Coffee- Dunkin Donuts
Box pumpkin bread- Any grocery
Sugar Pumpkins- Any grocery
Pumpkin Ale- Brooklyn Brewery (Check out the Roasted Pumpkin pictured too- Oct 7)

Pumpkin Tea- Bigelow

Pumpkin Ravioli- Any Grocery
That's all that I've come across. If you've gotten your hand on any other Pumpkin stuff, let me know I would love to get more pumpkins in while I still can! I might turn into a pumpkin, but hey there are worse things!
Sunday, October 21, 2012
Pumpkin Bread
Pumpkin Bread is another staple Pumpkin recipe that you should have in your repertoire. It's easy to make and good to have as a breakfast or mid-morning snack. I added sprinkles to the top of mine, but try adding walnuts, raisins, pecans, or icing to yours.
Ingredients
Flour, 1 1/2 cups
Salt, 1/2 teaspoon
Sugar, 1 cup (I used 1/4 cup and a tablespoon of honey)
Baking soda, 1 teaspoon
Pumpkin Spices, Cinnamon, Nutmeg, Allspice, Ginger
Pumpkin Puree, 1 cup (see Oct 1st to use a real pumpkin, that you cut up yourself-it's a treat!)
Olive Oil, 1/2 cup
Eggs, 2, scrambled
Water, 1/4 cup
Fall Sprinkles
Step 1: Preheat oven to 350 degrees. Grease a loaf pan with butter.
Step 2: Mix dry ingredients in a large bowl and whisk together.
Step 3: In a larger bowl, mix wet ingredients thoroughly.
Step 4: Combine dry ingredients into wet until just incorporated.
Step 5: Pour mixture into a 9x5 loaf pan and put sprinkles on top.
Step 6: Bake at 350 for 50-60 minutes.

I hope you liked this one. It was a delicious breakfast for me with morning! We're coming to the end of the 31 days so get your pumpkin in while you still can!
Ingredients
Flour, 1 1/2 cups
Salt, 1/2 teaspoon
Sugar, 1 cup (I used 1/4 cup and a tablespoon of honey)
Baking soda, 1 teaspoon
Pumpkin Spices, Cinnamon, Nutmeg, Allspice, Ginger
Pumpkin Puree, 1 cup (see Oct 1st to use a real pumpkin, that you cut up yourself-it's a treat!)
Olive Oil, 1/2 cup
Eggs, 2, scrambled
Water, 1/4 cup
Fall Sprinkles
Step 1: Preheat oven to 350 degrees. Grease a loaf pan with butter.
Step 2: Mix dry ingredients in a large bowl and whisk together.
Step 3: In a larger bowl, mix wet ingredients thoroughly.
Step 4: Combine dry ingredients into wet until just incorporated.
Step 5: Pour mixture into a 9x5 loaf pan and put sprinkles on top.
Step 6: Bake at 350 for 50-60 minutes.
I hope you liked this one. It was a delicious breakfast for me with morning! We're coming to the end of the 31 days so get your pumpkin in while you still can!
Saturday, October 20, 2012
Pumpkin Martini
Pumpkin Martini: need I say more?
Ingredients
1 part creme liquor
2 parts vanilla vodka
1 part pumpkin liquor
Step 1: Assemble ingredients
Step 2: Mix together well
Enjoy!
Ingredients
1 part creme liquor
2 parts vanilla vodka
1 part pumpkin liquor
Step 1: Assemble ingredients
Step 2: Mix together well
Enjoy!
Friday, October 19, 2012
Jack-O-Lanterns
Boo! Halloween is approaching and what better way to get in the mood then with a big ‘ol Jack-O-Lantern! And this weekend is probably the best time to go pick a pumpkin and carve it up! They are fun to decorate your porch, fireplace, anywhere really. You’re lucky to have a prize winning pumpkin carver showing you the ropes! In my freshman year of college my roommate and I carved the winning pumpkin in our dining hall competition. It was a funny little pumpkin with dollar signs for eyes and big smile with a tongue (made of a piece of pumpkin) sticking out! Our message was we are greedy-to win this competition, and win it we did (and it was totally because we had the best pumpkin and not because we stole ballots and wrote them in our dorm with different colored pens and different handwriting!) It was worth it because we got a sweet gift certificate that we used to buy our favorite thing: DESSERT! Oh good times. You too could be having good times right now by carving your very own pumpkin! I’ll be explaining how to do a traditional one, but if you have more artistic ability go for it. You can check out my pinboard to see some carving ideas! There are some really good ones.
Supplies
Knife
Candles
Creativity : )
Step 1: Get a Pumpkin!
You can pick one up at your local grocery, or other store that may sell
pumpkins. Or you can go to field a pick
one!
Step 2: Get out a
Knife and cut off the top. Cut in a
circular motion around the stem top.
Pull out the stem and discard. (See
Oct 1 to refresh your memory on how to do this). Scoop out the goop inside and while you’re at
it why not make roasted pumpkin seeds? (See Oct 3 for that great recipe)
Step 3: Find the best
side of your pumpkin and make that the front.
Use your knife to carve out the front in a design. The traditional look is two triangle eyes, an
upside-down triangle nose, and a half-moon smile.
Step 4: Put a candle
in there and watch the glow. Spooky
right?
Please post any comment or pictures of your great pumpkin
creation either to this blog or to the 31 Days of Pumpkin on Facebook! And don’t forget to check-out my 31 Days of
Pumpkin Pinboard for more carving ideas.
There’s a cool one about using cookie cutters!
Thursday, October 18, 2012
Celebratory Pumpkin Cupcakes: The Decoration
So part two of Pumpkin Cupcakes features my up and coming decoration skills! Decorating cupcakes is something new I am trying. In that past I would just slap on some store bought icing and look longingly at those super fancy cupcakes in bakeries wishing I could do that. Well, I actually can't do that (not yet!) but I'm trying and I even surprised myself with my handiwork.
Supplies
Sprinkles, I got a fancy fall kind with Pumpkins
Food Coloring, red, yellow, green
Pastry Bags and Tips
Ingredients
(Note this icing recipe is for 12 cupcakes, I only made 6 so I cut the recipe in half)
Butter, 3/4 cup, softened.
[Pro-tip: To soften butter leave it out for an hour before. In a hurry? Use the stove to help along the process]
Confectioner's Sugar, 2 cups. (I actually didn't scrimp on the sugar because there was none in the cupcakes and also I am new at this icing stuff so I got to get a handle on it before I cut stuff out!)
Milk, 1 Tablespoons.
Vanilla Extract, 1 teaspoon.
Step 1: Cream together butter and sugar with a wooden spoon.

Step 2: Add milk and vanilla and mix
Step 3: Get cooled cupcakes and ice a few with a pallet knife (or regular knife, or this fancy little serving knife thing I used, whatever works for you). To ice take a large scoop of icing (mine came out a little because I used 2 tablespoons of milk for some reason) and spread it back and forth over the cupcake.

Step 4: If you want to decorate some with sprinkles add right away.

Step 5: Pick ones you want to add an icing design too and put in the fridge to the icing hardens.
Step 6: Take a few scoops of icing and put in a smaller bowl. Add a drop of red and two drops of yellow food dye to the smaller bowl of icing. Ice a few more cupcakes and add sprinkles. Save a bit of white icing for later.

(Note: Icing will keep for a week in the fridge, but take it out an hour before using)
Step 7: After a few hours in the fridge remove the other cupcakes. As I mentioned yesterday this was my first time using an icing decorating kit. I just followed the instructions. I cut off the tip of the bag and dropped the metal tip into the bag so that it stuck out of the hole a little. I used a spoon to put orange icing in the bag (it was not full because I only iced 2 cupcakes this way).


Step 8: Sqeeze out the icing onto the cupcake. I made a large pumpkin shaped circle on the cupcakes. I did this by making a dot and then sqeezing more icing to make a larger dot. Then I took a bit of the left over white icing and added a drop of green. I used a spoon to take a tiny bit of icing to make the stem of the Pumpkin.

And that's it. Icing for beginners! I loved it! Maybe by next year I'll be make elaborate giant pumpkin cupcakes! I hope you had fun.

Supplies
Sprinkles, I got a fancy fall kind with Pumpkins
Food Coloring, red, yellow, green
Pastry Bags and Tips
Ingredients
(Note this icing recipe is for 12 cupcakes, I only made 6 so I cut the recipe in half)
Butter, 3/4 cup, softened.
[Pro-tip: To soften butter leave it out for an hour before. In a hurry? Use the stove to help along the process]
Confectioner's Sugar, 2 cups. (I actually didn't scrimp on the sugar because there was none in the cupcakes and also I am new at this icing stuff so I got to get a handle on it before I cut stuff out!)
Milk, 1 Tablespoons.
Vanilla Extract, 1 teaspoon.
Step 1: Cream together butter and sugar with a wooden spoon.
Step 2: Add milk and vanilla and mix
Step 3: Get cooled cupcakes and ice a few with a pallet knife (or regular knife, or this fancy little serving knife thing I used, whatever works for you). To ice take a large scoop of icing (mine came out a little because I used 2 tablespoons of milk for some reason) and spread it back and forth over the cupcake.
Step 4: If you want to decorate some with sprinkles add right away.
Step 5: Pick ones you want to add an icing design too and put in the fridge to the icing hardens.
Step 6: Take a few scoops of icing and put in a smaller bowl. Add a drop of red and two drops of yellow food dye to the smaller bowl of icing. Ice a few more cupcakes and add sprinkles. Save a bit of white icing for later.
(Note: Icing will keep for a week in the fridge, but take it out an hour before using)
Step 7: After a few hours in the fridge remove the other cupcakes. As I mentioned yesterday this was my first time using an icing decorating kit. I just followed the instructions. I cut off the tip of the bag and dropped the metal tip into the bag so that it stuck out of the hole a little. I used a spoon to put orange icing in the bag (it was not full because I only iced 2 cupcakes this way).
Step 8: Sqeeze out the icing onto the cupcake. I made a large pumpkin shaped circle on the cupcakes. I did this by making a dot and then sqeezing more icing to make a larger dot. Then I took a bit of the left over white icing and added a drop of green. I used a spoon to take a tiny bit of icing to make the stem of the Pumpkin.
And that's it. Icing for beginners! I loved it! Maybe by next year I'll be make elaborate giant pumpkin cupcakes! I hope you had fun.
Wednesday, October 17, 2012
Celebratory Pumpkin Cupcakes
So this is going to be a two post recipe about Pumpkin
Cupcakes. Today we will cover the
cupcakes, tomorrow we will be covering icing decoration! Cupcakes seem to be all the rage now don’t
they? I love that show 2 Broke Girls and
I think that sort of inspired me to want to bake cupcakes and decorate them all
pretty. I am really just starting to
learn to decorate cupcakes but I think I did a great job on these. And this time I did buy some super cute
pumpkin wrappers!

(Note: Prep-time is 15-20 minutes, bake time is 20-25 minutes)
(Note: Recipe and
ingredients are for 24 cupcakes. I
decided to alter the ingredients to make only 6 because I’m getting married
this summer and my fiance and I don’t need 24 cupcakes!)
Ingredients:
Flour, 2 cups
Sugar, 2 cups [Pro tip: I used no sugar because there is a
lot in the frosting, I would seriously consider cutting down the sugar to ¼ cup
or none at all]
Baking Soda, 1 & ½ teaspoons
Baking Powder, 1 teaspoon
Pumpkin Spices (See Oct 5 for pumpkin spice breakdown)
Pumpkin Puree, 2 Cups, or ½ pumpkin (See Oct 1 to see how to
use a real pumpkin rather than the can)
Eggs, 4, scrambled
Vegetable Oil, ½ cup
Milk, ½ cup
Step 1: Pre-heat oven
to 350 degrees. Line a cupcake pan with
paper liners. Spray down those liners
with non-stick spray.
Step 2: Mix together
dry ingredients into a medium/large bowl.
Step 3: Mix together
wet ingredients into a larger bowl.

Step 4: Combine dry
ingredients into wet in small portions.
Mix until just incorporated.
[Pro tip: Over-mixing will make your cupcakes loose air and
sink into themselves]
Step 5: Bake for
20-25 minutes in an oven heated to 350 degrees.
Let them cool in the pan for 5-10 minutes and then let them cook on a
rack for a few hours.
Once they are cool you can begin the decorating. Tomorrow, you will get to see how I decorated
mine. Spoiler alert: I use a pastry bag
for the first time! Hey now that we are
half way to our goal of worshiping pumpkins for 31 day why not like 31 Days of
Pumpkin on facebook or tell a friend about this blog, it would really make my
day!
Tuesday, October 16, 2012
We're Half Way There
Happy mid-way blog day!
Today marks the mid-point of 31 Days of Pumpkin! To
mark the occasion my amazing fiance brought me home Pumpkin Patch flowers! See the little pumpkins? Hopefully you can find these in your grocery
store, they really look great in the kitchen.


Woo, the month is just flying by. I feel pretty proud of myself for keeping up
with posting everyday. It’s been a lot
of work to try and make all these recipes and crafts, but I’m having a blast
doing it. I always make these pumpkin
treats each year, so it’s neat to have a record of it for posterity and not to
mention for your enjoyment. And thank
you to everyone who has been reading and liking my blog and my pumpkin
creations! So in sort of the style of a
“clip show” lets look back on my favorite pumpkin creations thus far!
Best Pumpkin Pie I ever made (Oct 2)
Pumpkin Scones (Oct 6)
Pumpkin Pasta (Oct 9)
Pumpkin Wreath (Oct 14)
Ah good times! If you
missed out on some of these posts go ahead and try them! That’s another great thing about this blog-
these recipes and crafts will always be here for you. So refer back to Pumpkin Pie for
Thanksgiving, or Pumpkin Beer to impress your friends! And keep coming back to 31 Days of Pumpkin
for even more great recipes and ideas to finish out the month! Tonight, I’m treating myself to some pumpkin
cupcakes to celebrate this milestone.
Those will be up for you tomorrow, tonight I’m taking a well-deserved break!
Monday, October 15, 2012
Creamy Pumpkin Crock-Pot Stew
Tonight we are going to make Creamy Pumpkin Crock-Pot Stew! This post is special because this meal was
prepared by my fiance, Matt. He sometimes
works from home and on those days he cooks dinner. He’s a master at the crock-pot and is always
cooking up good soups and stews for me!
Isn’t he the best?!
(Note: This should talk you 15-20 minutes to prepare and 4
hours to cook)
[Pro-tip: Crock-pots are amazing, if you don't have one, I would seriously consider getting one. We use ours all the time to make great meals, especially soups! Its easy and delicious cooking!]
Ingredients
Pumpkin Puree (See Oct 1), 2 cups (about ½ a pumpkin)
Onion, 1, chopped
Parsnip, 1, peeled and chopped
Carrot, 1 peeled and chopped
Mushrooms, 1 cup, chopped
Water, 2 cups
Half & Half, ½ cup
Step 1: Plug in crock
pot and set to high. Add pumpkin puree
to crock-pot.
Step 2: Cut up
vegetables into medium sized units. Don’t
feel limited to these vegetables, add different ones if you like. Or add some meat. I would have if I had some. Add vegetables to crock pot.

Step 3: Add 3 cups of
water and stir well. Really get in there
and mix up. Then add a 1/2 cup of
half&half and stir some more.
Step 4: Cook on high for 4 hours. Over that time the pumpkin should dissolve.
Step 5: When ready whisk the stew to further mix and
dissolve pumpkin. Add some garlic and
pepper to taste.

Enjoy! It was so
super yummy, creamy, smooth! What a
great meal (and fiance) to come home to!
Thanks Matt! Join me tomorrow
when I celebrate the mid-point of this blog!
YEY!
Sunday, October 14, 2012
DIY: Pumpkin Wreath
Today we are working on another craft! I will be showing you how to make a Pumpkin
Wreath. This is an easy craft that
leaves a lot of room for creativity and imagination. I picked up all the supplies on discount a
craft store. I was amazed at how nice it
came out and how much use I will get out of it for a fraction of the cost of
buying an already made wreath. Plus it has my own
signature style that fits in with the decor of my home.
Supplies:
Wreath

Beaded Garland
Synthetic Flowers with stems
Sparkly Pumpkin on a stick (If you can't find one of a stick don't worry- adapt! Get our your glue gun.)

Ribbon

Step 1: Wrap garland around wreath. I did this by sticking one end of the garland
through the wreath and then wrapping the rest around the wreath. Then I stuck the other end
of the garland through the wreath and twisted the two ends together.

Step 2: Stick the
flowers and the pumpkin through the wreath.
I placed them on the left side to be stylish.

Step 3: Tie ribbon around the wreath under the flowers.

Step 4: Hang on door and be amazed at your handiwork!
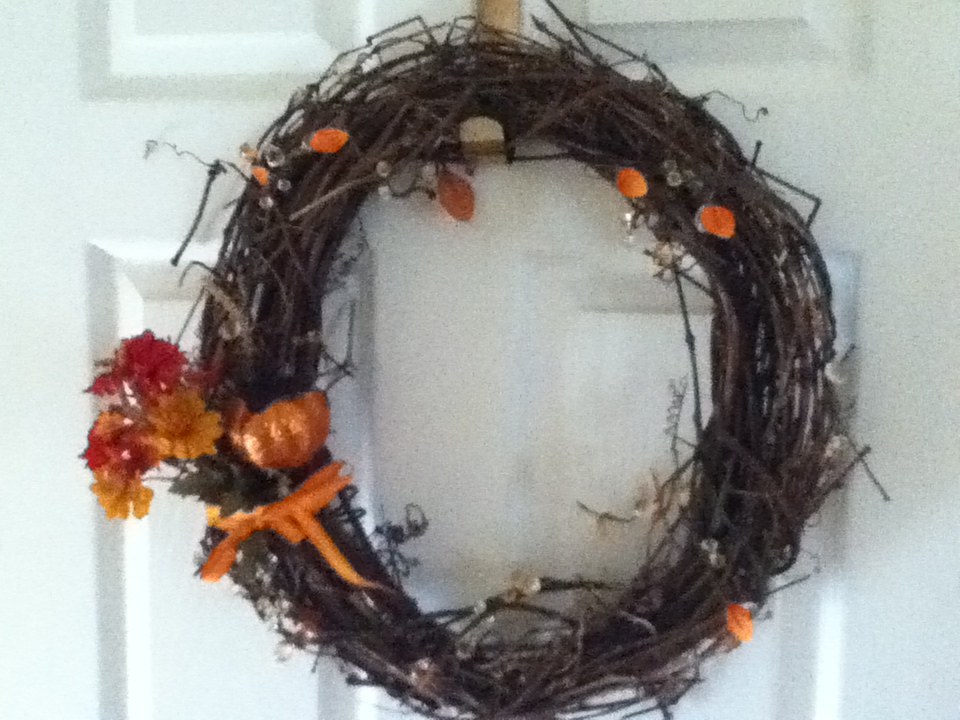
So you can do this pumpkin wreath like mine, which will look
so great! Or you can add your own flair
to it. Use whatever you have at home, or
can find at the store. Go where the
discounts are! Here are some additional
ideas:
More flowers
Paper flowers
More Pumpkins
Wrap ribbon around instead of garland
Synthetic Leaves
Saturday, October 13, 2012
Smooth Hands Pumpkin Sugar Scrub
I love a good hand scrub. It feels so decadent and calming to have smooth and soft hands. A few years ago my sister gave me a scrub from a beauty party she had at the house, you know those ones where a makeup sales woman comes and give you treatments. Since then I’ve discovered how easy it is to make your own. Last summer I made a lemon scrub. This October is all about pumpkins so why not smell like one! Plus it’s great for anyone who gets dry hands in the Autumn. I anticipate bringing this to work and using it at my desk. And with all the cooking and baking we’ve been doing your hands probably need some loving!
Ingredients
Brown Sugar, 2 Cups (I’m making a smaller batch to bring
into work so I used about ¼ cup)
White Sugar, 1 cup (again I used about ¼ cup)
Pumpkin Spices, a few shakes (I used cinnamon, allspice,
nutmeg, and ginger) (See Oct 5 break down of pumpkin spices)
(Note: I find with this recipe Allspice really gives the
scrub that pumpkin smell)
Vegetable or Sunflower Oil, 1 cup (I used a 4 tablespoons)
Step 1: Mix together
the dry ingredients. The brown sugar can
be a little clumpy, try your best to get the clumps out. And like I mentioned the allspice really gave
it that great smell!

Step 2: Add oil and mix thoroughly. I added about one table spoon at a time and
used 4 tablespoons in all. I like it
more on the liquidy side. It kind of
looks fudgey when it’s done.

Step 3: Store in an air tight container. (I used a tupperware, I wish I had something
cuter-next batch!)
To Use
Step 1: Wash hands with warm water.
Step 2: Take a quarter-sized about of scrub and rub all over
hands. The sugar scrubs at the skin, the
spices give it that delicious pumpkin smell, and the oil rejuvenates your
hands, leaving them soft and supple.
Step 3: Wash hands
and again with warm water.

Wow, my hands feel really smooth. And I keep smelling my hands, hehe. I’ll have to make some more for my sister - maybe
in a cuter container! These would make really fun gifts as well. And notice in the picture there is my pumpkin candle (see Oct 10) I'm really loving those around the house.
Friday, October 12, 2012
Accidental Pumpkin Biscuits
This is a funny story! So Wednesday I had this idea to try and make Pumpkin Gnocchi. I had just gotten home from work and thought I could just whip them up. I made the batter, it was looking really good and it tasted yummy. But when I put them in the water they kind of fell apart. They blew up and looked all mushy and tasted not that great. So I was disappointed. I didn’t use all the batter because it was a loosing prospect to make some more yucky gnocchi. So I thought: OK maybe this batter would make good cookies, it’s pretty similar ingredients, it’s just missing sugar and butter (and had flour-I don’t know what I was thinking with the cookies). But without stopping to think I plopped the dough in the oven. 15 minutes later the timer went off and out I pulled…Pumpkin Biscuits? Yup I looked at those puppies and thought: hey those look like biscuits. And when I tried one, I’ll be darned if they didn’t taste like delicious pumpkin biscuits. Sometimes when cooking/baking you just have to be open to change and go with the flow. And I’m glad I didn’t just get frustrated and throw out the batter. Now I know how to make pumpkin biscuits and now you can reap the rewards of my kitchen adventures!
Ingredients:
Pumpkin Puree, 1 ½ cups (See Oct 1st to make your
own real pumpkin puree)
Nutmeg
Egg
Flour, 1 ½ cups
Step 1: Pre-heat oven to 350 degrees and spray and cookie
sheet with non-stick cooking spray.
Step 2: Mix together pumpkin, nutmeg, and egg.
Step 3: Mix in flour ½ cup at a time. Mix until just incorporated.

Step 5: Do not continue on to make gnocci, lol.
Step 6: Place in an oven heated to 350 degrees for 12-15
minutes, until a toothpick comes out clean.

And you’ve got yourself some biscuits. They would go great on the side with Roasted
Pumpkin (Oct 7).

[Pro Tip: Liking 31
Days of Pumpkin on Facebook makes you an official Pumpkin Lover]
I was just told by my fiance that some of the world’s greatest
innovations were made by accident. I
like to think these pumpkin biscuits are right up there with the wheel. So go and try these and take with you the
spirit of flexibility. You might find
that it can help you in non-pumpkin related ways!
Thursday, October 11, 2012
Pumpkin Muffins
Today I’m covering Pumpkin Muffins. Make these little guys and you’ll be grabbing one each morning! I love making muffins mainly for the muffin wrappers. I like how you can buy different colors and designs. The one’s I’m using are red with white and yellow flowers. Ha ha too bad I don’t have ones with Pumpkins on them, a serious oversight on my part! I’ll be sure to rectify this when I do my pumpkin cupcake post in a few weeks!
Note: Yields 30 muffins and takes about 40 minutes to make.

Ingredients:
Flour, 3 cups
Pumpkin Spices (See Oct 5 for a break down of the pumpkin spices)
Baking soda, 2 teaspoons
Sugar, 3 cups (I only used ½ cup-I’m serious you don’t need
that much sugar for a great tasting treat!)
Pumpkin Puree, 2 cups (See Oct 1 to learn how to cook up
real pumpkin)
Eggs, 4, scrambled
Vegetable Oil, ½ cup
Water, ½ cup
Step 1: Pre-heat oven to 350 degrees. Paper line 30 muffin cups with super sweet muffin wrappers.
Step 2: Combine flour, spices, baking soda, and sugar in
large bowl.
Step 3: Combine pumpkin puree, eggs, oil, and water in a
larger bowl.
Step 4: Add flour mixture to the pumpkin mixture. Add in segments, mixing after each. Mix until just combined.
[Pro Tip: To prevent muffins from becoming too dense, be
careful not to over mix]
Step 5: Fill muffin
cups ¾ full.
Step 6: Place in an oven heated to 350 degrees for 25-30
minutes. You know they are done when you stick in a toothpick and it comes out clean.
Step 7: Cool in pan
for 10 minutes. Then transfer to wire
rack to cool completely.
[Pro Tip: To prevent the muffins from sticking to the
wrapper make sure the muffins are cooled completely]

What kind of awesome muffin wrappers did you use? Don’t be shy, comment! Or like 31 Days of Pumpkin of Facebook and
leave a comment there. Click the link on
the side bar for more pumpkin greatness.
Now go and enjoy those muffins! That’s an order!
Subscribe to:
Posts (Atom)