So I thought the first post had to be dedicated to Pumpkin Pie. It’s a classic pumpkin food and it’s also something you want to know how to make. But first, you need to get yourself a pumpkin and cook it up. This first post will help you with other recipes I will post this month, so refer back to it as necessary. I know, you could just get the canned stuff, but this is going to be more fun, I promise! If you learn nothing else from this blog then at least learn how cook up a pumpkin. I started doing this a few years ago and I really enjoy it. For me, it makes the cooking process more hands-on, it tastes better, and it makes the house smell awesome! So today we tackle the pumpkin and tomorrow we bake the pie!
Note: Cutting and Cooking the pumpkin should take you about
30 minutes for cutting and an hour or so
for cooking.
Good News: This blog comes in app form so you can read while
you bake! Just go to www.31daysofpumpkin.blogspot.com
on your mobile device!
Step 1: Pick the Pumpkin.
Really, you can eat any pumpkin, though some are tastier than
others. There are different kinds of
pumpkins, but I like to use the medium-sized traditional pumpkin looking ones-called
sugar pumpkins. You can find them in
Grocery Stores easily this time of year.
If you’re going to a field to pick your pumpkin stay away from those
large Jack-o-Lantern types for cooking (but be sure to pick one up for my
Jack-Lantern post in a few weeks) because they are harder to work with and not
as sweet. Go for a nice medium sized
one. Here’s the one I’m using for an
idea.

Step 2: Wash the
pumpkin. A very important step. You want to make sure your pumpkin is clean
and safe for eating. And while you’re at
it, pre-heat your oven to 350 degrees.
Step 3: Cut the pumpkin.
It looks harder than it actually is.
You need a bigger knife than you commonly use. Check out the one I am using.

So it starts out the same for jack-o-lanterns,
cut around the stem in a circular motion.

Then pull off the stem cap. Throw away.
Next pull out the seedy pulp using an ice cream scoop or a large spoon.
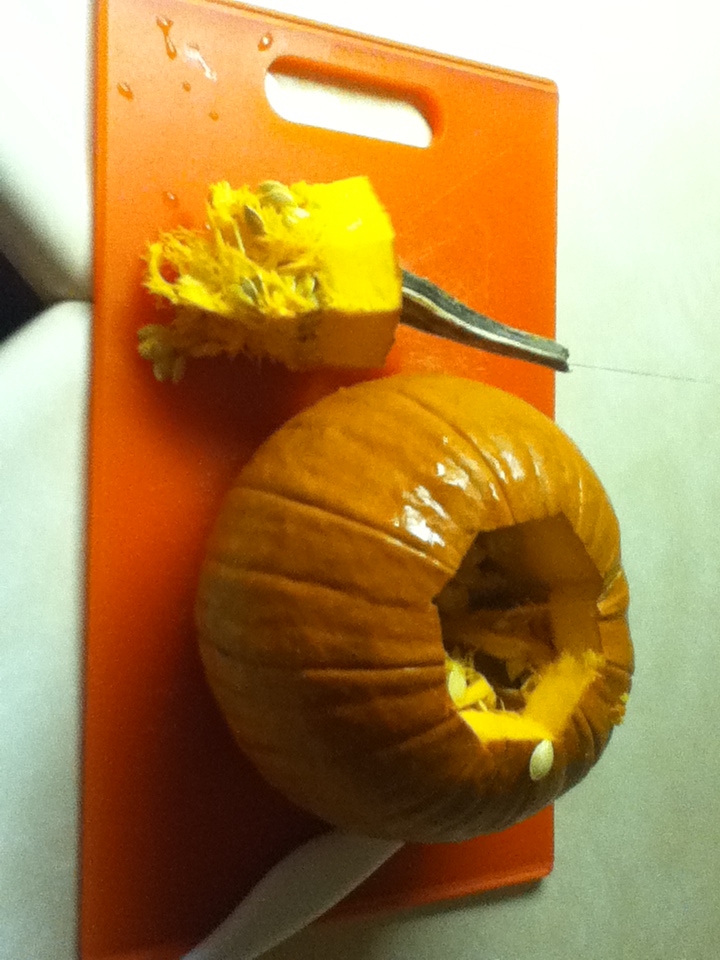
Put the pulp in a bowl, cover it with plastic
wrap, and keep it in the fridge. Save it for roasted pumpkin seeds (which I’ll
be covering on Oct 3). Next cut the
pumpkin in half and then cut those halves in half so you have four pieces. It
might be slightly tough to cut the pumpkin at first, but you can do it! With a
little bit of force, you should have no problem. (Note: If you see more pulp
after cutting the pumpkin in half, remove that as well.)

Step 4: Cooking the pumpkin.
Place the pumpkin pieces flesh side up in a glass or porcelain dish that
has a little bit of water in it (enough to cover the bottom). Don’t be afraid to overlap them a
little.

Cover with a lid or tinfoil and
place in an oven heated to 350 degrees for an hour until it can be punctured
with a fork and feels squishy. It should
feel so squishy that you can puree it easily and you should be able to start to
peel away the rind, if not try 15 more minutes in the oven.
Step 5: Cool the Pumpkin.
Let it cool down so as not to burn yourself.
Step 6: Peel the
Pumpkin. Now that the pumpkin is all
soft you can use tongs to peel the rind right off. You’ll be surprised at how easy it is! (I just
discovered I don’t have tongs so I’ll be using a fork)
Note: For stubborn
pumpkins (like mine today) : if the flesh is mushy enough but the rind won’t
seem to peel away use a fork to scoop out the inside, like hollowing an
avocado.
Step 7: Mash the Pumpkin. Put the flesh of the pumpkin in a bowl and
mash away! I find a fork to be easiest
to use. Do this until it gets to be a
nice shmooshy consistency (Note: as you’ve become aware of at this point, I
don’t use technical terms or measurements that much. My goal is for this blog to help you picture
what I’m doing as I do it along with you!)
Step 8: Congratulate
yourself on taming that pumpkin! If you’re
not using the pumpkin right away, place in the fridge. The Pumpkin puree should last 3 days in the
fridge (unless you freeze it-pumpkin puree defrosts easily).
A look ahead:
Tomorrow we will be using most of this pumpkin puree to make a pumpkin
pie. We will use the seeds (which you
saved, right?) to make roasted pumpkin seeds on Wednesday. Then Thursday we’ll use the remainder of the
pumpkin for pumpkin pancakes! Yum! See how one pumpkin gave us three delicious
treats! Don’t you just love pumpkins?!
If 31 days of pumpkin isn’t enough pumpkin for you, then
check out my Pinboard: 31 days of pumpkin for more fun ideas and recipes! Also like 31 Days of Pumpkin on Facebook follow me on
twitter @31DaysofPumpkin!
No comments:
Post a Comment